Hello everyone and thank you for visiting my blog here at Sleepless Nights Ceramics. As this is my first blog post, I'd like to do a small introduction to get us started. My name is Angelo Silecchia and I am a ceramic artist. I'm currently getting my ceramic bachelors in Fine Arts from the University of Central Florida. I find great joy in the act of making and exploring the process. My work primarily revolves around functional ceramics and how the traditional forms can be altered and elevated into the realm of high art while still retaining the objects functional aspect. The work I'm pursuing in preparation for my BFA exhibition is that of altered ceramics fired in soda and wood atmospheres.
This work has been a long time in the making, but as life often does, things got in the way. However, recently I began converting an old electric kiln into a combination wood and soda kiln. This conversion was made with considerable research into other conversions and how downdraft kilns work. Prior to this conversion, I fired a close friend's converted and small brick built kiln. This experience helped me plan how I would be firing my own.
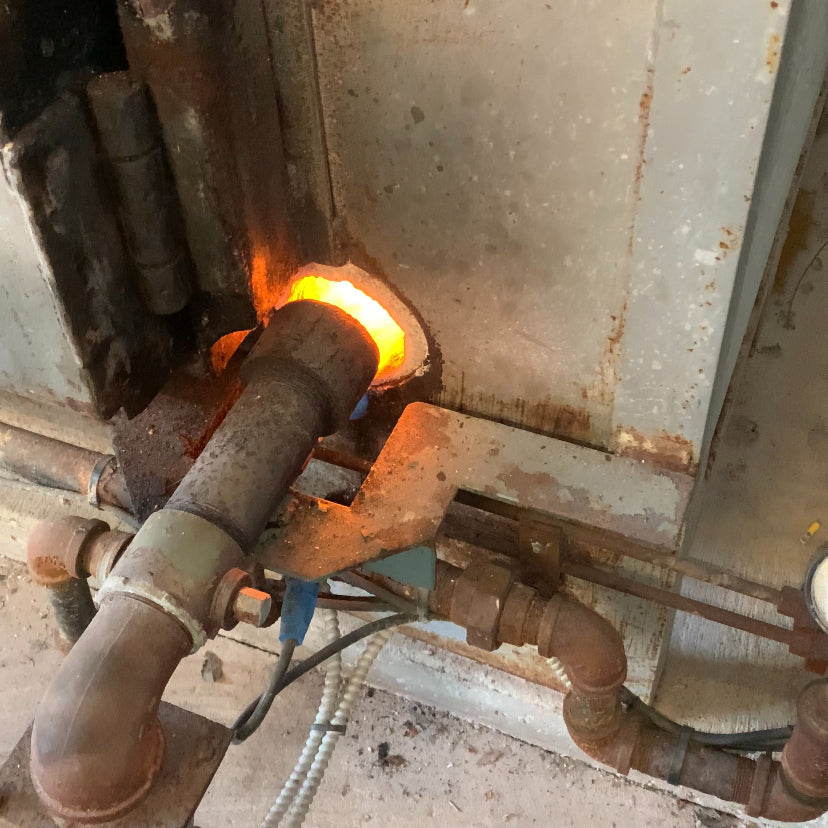
The conversion started with the kiln shell. It is an old kiln; comparable in size to a Skutt 1231. The first step was to take all of the old elements out of the kiln and remove the external control box. Once this was done I began constructing what would be the internal chimney. To do this and give myself the optimum set up for my kiln, I designed and planned for the internal area of the kiln to be split into thirds: one third my chimney, one third space for work, and one third fire box. Knowing this made the preparation for making the chimney easy. I took K-26 soft brick designed for temps up to 2600°F and created a platform to hold a rectangular kiln shelf in a grove carved out from the soft brick. These bricks and kiln shelf would go inside of the kiln to create my internal chimney. Once all the brick was cut to shape, the bricks and kiln shelf were cemented in place with kiln mortar. On either side of the chimney, I cut out two holes through the outer metal shell and the soft brick wall of the kiln with a hole saw. This gave me two burner ports. I then took some slip or liquid clay and placed it on the perimeter of the chimney and shut the lid. This gave me the shape and placement of where I had to drill and cut out the roof of the kiln for the chimney flue. The last alteration I did was cut out a square to serve as the entrance for the firebox, which matched the size of two cemented soft bricks.

The Base layer of bricks and the first set of bricks with groves to hold the shelf.

The chimney cemented in place and dry with the bottom ware shelf in front.

Kiln with burner ports, chimney opening, and firebox entrance.
After the conversion was done, I started to make a body of work to test out. The clay body I used was a recipe I have been developing that would show the atmospheric effects of the kiln. This clay body has two forms, a very clean and smooth form I use for external decoration such as brushwork, and a form with additional inclusions like sand, silica, feldspar rock and more. Once bisqued, I glazed the inside of some of the cups with my favorite liner glaze and did some brushwork decoration as well. Then the loading of each level in the kiln began.

Bisque ware being glazed and decorated.

First shelf level.

Second shelf level.

Third and top shelf level.
I began my firing, and to be frank, I was very nervous as this was my first official solo firing. I also have a bad habit of putting a great deal of pressure on myself. I think this comes from the fact that I have big goals and as I stated at the beginning, I sometimes feel like I'm behind where I should or could be. Nevertheless, I went into the firing with a good attitude and I felt like my kiln and tools could sense my intent. It fired fantastically, getting up to 2100°F quickly and consistently. From there I stoked the kiln with my soda ash solids which I placed inside of split bamboo and wood while spraying soda ash every five to ten minutes for about an hour and a half. I accomplished this while controlling the settings on the burners so it didn’t drop significantly in temperature. Once everything was stoked and sprayed it continued to climb in temperature until it reached cone ten (2350°F). From there, I shut off the burners and closed all ports and openings and stepped back, trusting that I had done all that I could for this firing.

Soda solids in bamboo

Open firebox mid stoke.
I returned the following day to unload and there were more gifts then I could have imagined,


Work from the Kiln.
The unloading was more than a little emotional, my eyes welled up with tears. I was surrounded by people that love and care about me and have stood by me and my art and I had the opportunity to share that moment with them. This firing was more than just a proof of concept; it served as a reminder that I am on the right path and that I have people that have my back on the hard days and are by my side on the good ones.
Thank you all for reading and I look forward to documenting my journey.
Your friend in clay,
Angelo